背景介绍
之前一直使用ss 或者ssr的方案,但是随着长城的进化,这种方式以及逐渐被老大哥盯上了,
因此ss也就变成重点关照对象,线路干扰非常严重,需要新的姿势穿越到外面的世界。
v2ray介绍
v2ray是使用golang编写的自由软件, 具有跨平台,高性能以及可用性高等特点,支持的协议很多,比ss高到不知道哪里去 因此选定作为新的方案。
前提
- 一个刷了openwrt的路由器,这里使用的是薅羊毛来的斐讯k2
- 编译环境,这里是用CentOS x64
- golang环境
- 一个善于利用搜索引擎的大脑
目的
实现在路由器内无感知地翻墙,包括该路由下的所有设备,且不需要额外的软件支持
网络结构
------移动光纤接入---光猫+1级路由(192.168.1.1)----Openwrt二级路由(192.168.2.1)---手机,电脑,iPad等终端设备
准备
由于斐讯k2的性能太差了,所以目前还很少固件原生支持v2ray,
因此决定对v2ray交叉编译,移植到k2路由里,
golang环境准备就不说了,先获取v2ray的源码:
go get -u v2ray.com/core/...
go get -u v2ray.com/ext/...
第二个貌似是可选的
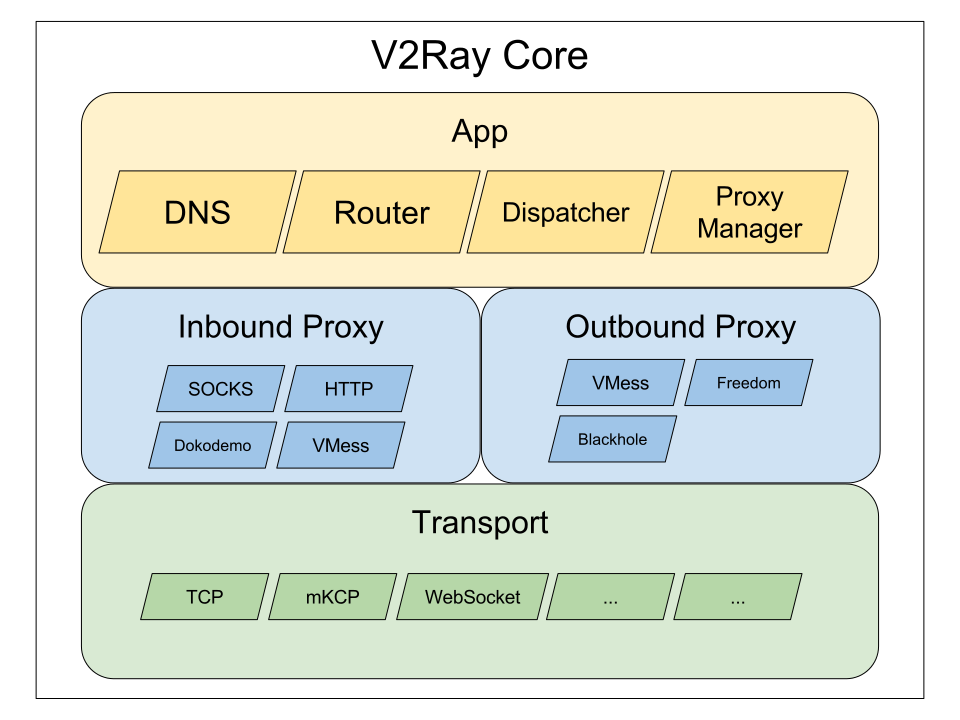
vray的架构如下图
编译之前删除不必要的功能(该路由性能比较差,需要阉割一部分功能)
具体如下:
vim main/distro/all/all.go
由于最终是运行在路由器之上,一些没用到的模块就可以忽略了,
包括 optional features是可选的,所以全部删除
入站和出站模块在这个解决方案中只涉及dokodemo,freedom和 outbound,剩下的代理模式都不是必要的,比如blackhole就像是广告过滤那一类的就可以删除了
看了下配置文件,传输层也可以简化下, 比如domainsocket,kcp,quic和websocket都没用上,那就先注释调好了
最后是json config
记得注释_ "v2ray.com/core/main/json"这一行,,并启用 _ "v2ray.com/core/main/jsonem"
这很重要,因为使用jsonem这个包可以不需要v2ctl,如果使用默认配置,在使用的时候./v2ray -config your_config.json是读取不了的,因为默认是依赖了v2ctl。修改这个依赖可以大大节省空间,不需要再编译v2ctl。
最终文件如下:
package all

import (
	// The following are necessary as they register handlers in their init functions.

	// Required features. Can't remove unless there is replacements.
	_ "v2ray.com/core/app/dispatcher"
	_ "v2ray.com/core/app/proxyman/inbound"
	_ "v2ray.com/core/app/proxyman/outbound"

	// Default commander and all its services. This is an optional feature.
	_ "v2ray.com/core/app/commander"
	_ "v2ray.com/core/app/log/command"
	_ "v2ray.com/core/app/proxyman/command"
	_ "v2ray.com/core/app/stats/command"

	// Other optional features.
//	_ "v2ray.com/core/app/dns"
//	_ "v2ray.com/core/app/log"
//	_ "v2ray.com/core/app/policy"
//	_ "v2ray.com/core/app/reverse"
//	_ "v2ray.com/core/app/router"
//	_ "v2ray.com/core/app/stats"

	// Inbound and outbound proxies.
//	_ "v2ray.com/core/proxy/blackhole"
	_ "v2ray.com/core/proxy/dokodemo"
	_ "v2ray.com/core/proxy/freedom"
//	_ "v2ray.com/core/proxy/http"
//	_ "v2ray.com/core/proxy/mtproto"
//	_ "v2ray.com/core/proxy/shadowsocks"
//	_ "v2ray.com/core/proxy/socks"
//	_ "v2ray.com/core/proxy/vmess/inbound"
	_ "v2ray.com/core/proxy/vmess/outbound"

	// Transports
//	_ "v2ray.com/core/transport/internet/domainsocket"
	_ "v2ray.com/core/transport/internet/http"
//	_ "v2ray.com/core/transport/internet/kcp"
//	_ "v2ray.com/core/transport/internet/quic"
	_ "v2ray.com/core/transport/internet/tcp"
	_ "v2ray.com/core/transport/internet/tls"
	_ "v2ray.com/core/transport/internet/udp"
//	_ "v2ray.com/core/transport/internet/websocket"

	// Transport headers
	_ "v2ray.com/core/transport/internet/headers/http"
	_ "v2ray.com/core/transport/internet/headers/noop"
	_ "v2ray.com/core/transport/internet/headers/srtp"
	_ "v2ray.com/core/transport/internet/headers/tls"
	_ "v2ray.com/core/transport/internet/headers/utp"
	_ "v2ray.com/core/transport/internet/headers/wechat"
	_ "v2ray.com/core/transport/internet/headers/wireguard"

	// JSON config support. Choose only one from the two below.
	// The following line loads JSON from v2ctl
//	_ "v2ray.com/core/main/json"
	// The following line loads JSON internally
	 _ "v2ray.com/core/main/jsonem"

	// Load config from file or http(s)
	_ "v2ray.com/core/main/confloader/external"
)
交叉编译
执行编译:
env GOOS=linux GOARCH=mipsle GOMIPS=softfloat go build -ldflags '-w -s' -o v2ray
说明:
如果是在macOS下编译,必须需要指定GOOS=linux
GOARCH=mipsle,因为这里的k2路由器cpu是MT7620A系列,属于mipsle架构
GOMIPS=softfloat 模拟软浮点类型,解决一运行就报"Illegal instruction"这样的错误,目标机器没有 FPU,指令集缺乏相关的指令,所以只能用软件模拟浮点数运算。参考
-ldflags '-w -s' 其中-s 去掉符号信息, -w 去掉 DWARF 调试信息(去掉后无法是用 GDB 进行调试),这里也不需要,能减就减
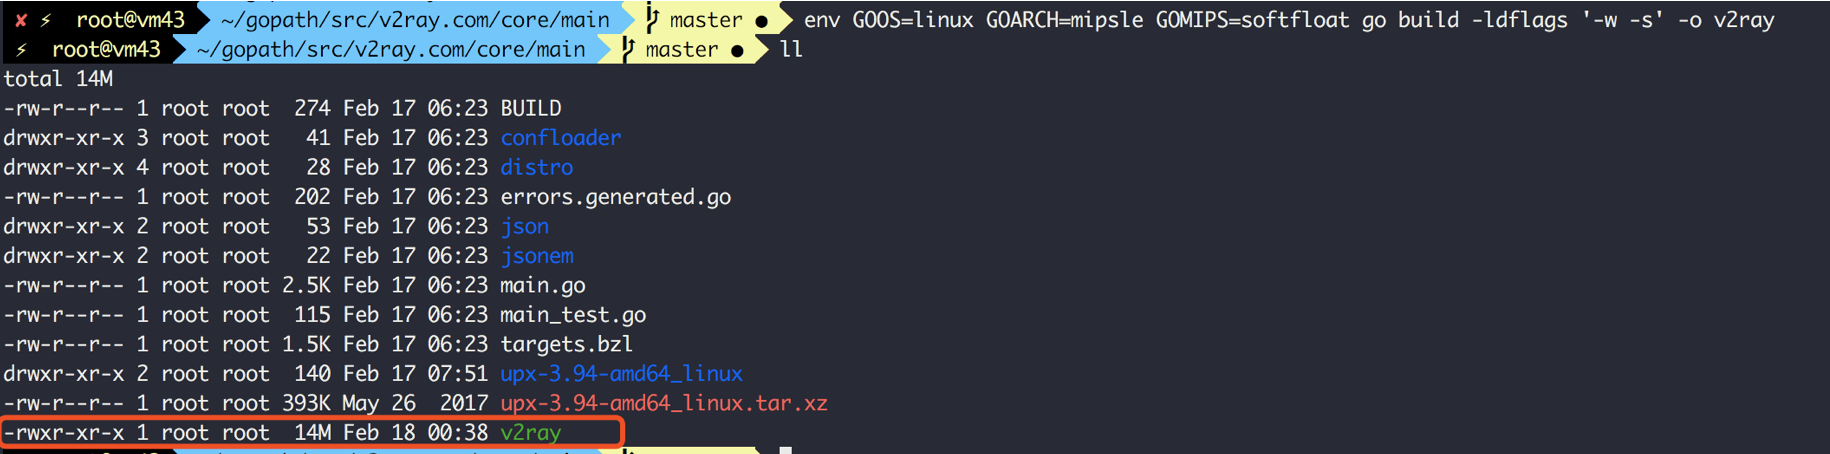
编译成功后可以看到输出v2ray这个二进制文件,大小14M
使用upx压缩
对于k2路由器而言,这个二进制实在太大了. 可以使用工具压缩下,
upx是一个使用C++写的开源加壳压缩工具,具体可看其介绍 通过upx压缩的程序在功能上不会有影响,cpu仍然能读到这些机器指令。经测试这东西的压缩率挺高的。
安装
1.下载upx
wget -c https://github.com/upx/upx/releases/download/v3.95/upx-3.95-amd64_linux.tar.xz
2.解压
tar -Jxf upx-3.95-amd64_linux.tar.xz
3.加入默认环境目录
复制upx到全局可访问的路径下,比如$GOPATH/bin
cd upx-3.95-amd64_linux && mv upx $GOPATH/bin
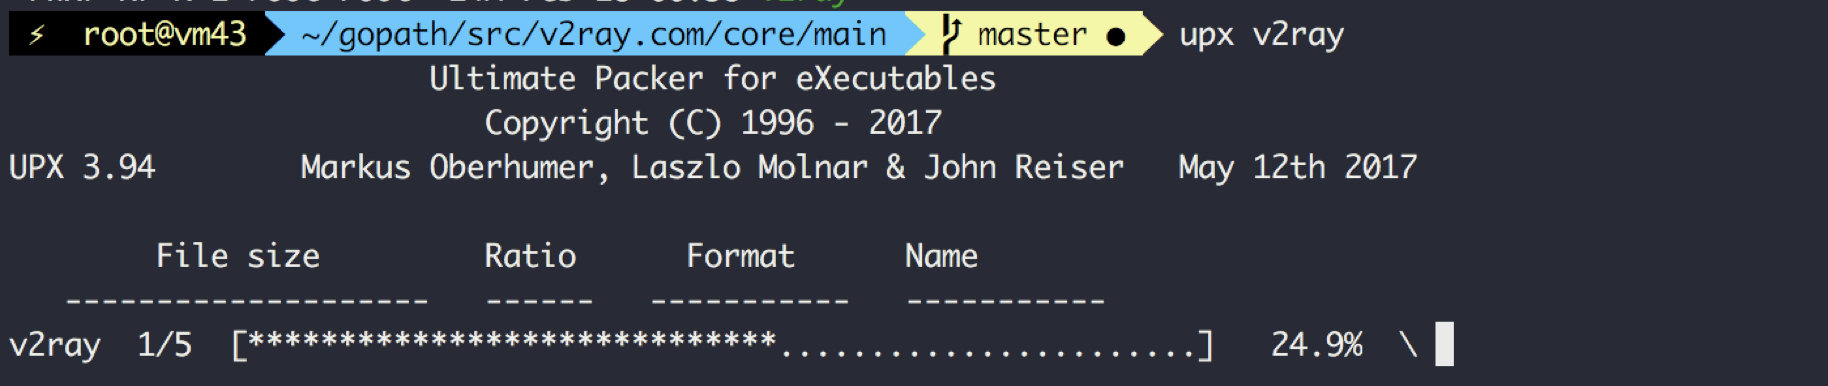
upx压缩
执行
upx v2ray
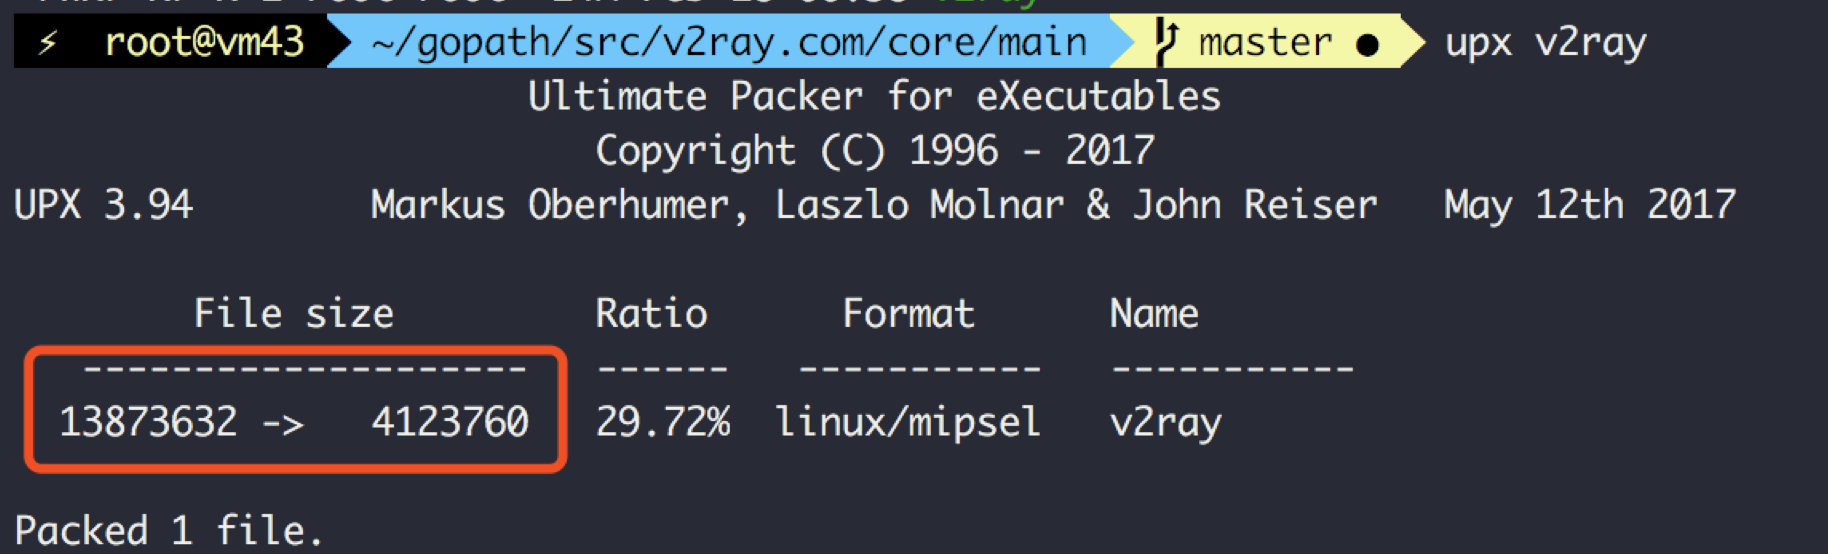
好家伙,直接从14M 压缩到4M
上传到路由器
这里把刚才编译的v2ray上传到路由器的/tmp下
scp v2ray 192.168.2.1:/tmp
然后登陆到路由并cd到/tmp下
./v2ray -version 应该成功输出,
恭喜,完美编译
路由器配置
1.网关设备开启 IP 转发。登陆路由在/etc/sysctl.conf 文件添加开启选项并让其生效:
echo 'net.ipv4.ip_forward=1' >> /etc/sysctl.conf
sysctl -p
2.设置路由器IP为静态IP,这里使用k2作为二级路由,或者说网关,固定网关的IP为192.168.2.1
有两个作用: 一是为了避免重启后 IP 会发生变化导致其他设备无法联网 二是区分上级网络192.168.1.1/255.255.255.0,
k2路由设置为DHCP模式,为连入的设备自动分配IP和转发即可
注意测试下,此时路由上和连如的设备都是可以上网的,只是不能自动翻出去而已。如果这时候不能上网请先修复网络,免得后面白折腾。
3.修改v2ray的配置文件v2ray.json,添加入站规则
假设你已经有了可使用的配置,并已经上传到路由。
示例如下:(配置中的...代表原来客户端的通常配置)
{
"routing": {...},
"inbounds": [
 {
   ...
 },
 {
   "port": 54321, //开放的端口号
   "protocol": "dokodemo-door",
   "settings": {
     "network": "tcp,udp",
     "followRedirect": true // 这里要为 true 才能接受来自 iptables 的流量
   },
   "sniffing": {
     "enabled": true,
     "destOverride": ["http", "tls"]
   }
 }
],
"outbounds": [
 {
   ...
   "streamSettings": {
     ...
     "sockopt": {
       "mark": 255  //这里是 SO_MARK,用于 iptables 识别,每个 outbound 都要配置;255可以改成其他数值,但要与下面的 iptables 规则对应;如果有多个 outbound,最好奖所有 outbound 的 SO_MARK 都设置成一样的数值
     }
   }
 }
 ...
]
}
解释下
(1) 在inbound规则中添加一个设置,其中指定了一个端口号,即使iptables中会转发到此端口,我们v2ray针对该端口的流量进行处理。
(2) 添加的协议为"任意门“即dokodemo-door
(3) outbound下的streamSettings添加一个值sockopt
 {
   "port": 54321, //监听的透传端口号
   "protocol": "dokodemo-door",
   "settings": {
     "network": "tcp,udp",
     "followRedirect": true // 这里要为 true 才能接受来自 iptables 的流量
   },
   "sniffing": {
     "enabled": true,
     "destOverride": ["http", "tls"]
   }
 }
下面是一个完整的配置,仅供参考
{
  "dns" : {
    "servers" : [
      "localhost"
    ]
  },
  "inbounds" : [
    {
      "port": 54321,
      "protocol": "dokodemo-door",
      "settings": {
        "network": "tcp,udp",
        "followRedirect": true
        },
        "sniffing": {
          "enabled": true,
          "destOverride": ["http", "tls"]
          }
    },
    {
      "listen" : "0.0.0.0",
      "port" : 1081,
      "protocol" : "socks",
      "tag" : "socksinbound",
      "settings" : {
        "auth" : "noauth",
        "udp" : false,
        "ip" : "127.0.0.1"
      }
    },
    {
      "listen" : "0.0.0.0",
      "port" : 8001,
      "protocol" : "http",
      "tag" : "httpinbound",
      "settings" : {
        "timeout" : 0
      }
    }
  ],
  "outbounds" : [
    {
      "sendThrough" : "0.0.0.0",
      "mux" : {
        "enabled" : false,
        "concurrency" : 8
      },
      "protocol" : "vmess",
      "settings" : {
        "vnext" : [
          {
            "address" : "35.1.1.1",
            "users" : [
              {
                "id" : "710c31ec-acc0-40ff-bbe8-",
                "alterId" : 64,
                "security" : "auto",
                "level" : 1
              }
            ],
            "port" : 12306
          }
        ]
      },
      "tag" : "gce",
      "streamSettings" : {
     "sockopt": {
       "mark": 255
     },
        "wsSettings" : {
          "path" : "",
          "headers" : {

          }
        },
        "quicSettings" : {
          "key" : "",
          "security" : "none",
          "header" : {
            "type" : "none"
          }
        },
        "tlsSettings" : {
          "allowInsecure" : false,
          "alpn" : [
            "http\/1.1"
          ],
          "serverName" : "server.cc",
          "allowInsecureCiphers" : false
        },
        "sockopt" : {

        },
        "httpSettings" : {
          "path" : "",
          "host" : [
            ""
          ]
        },
        "tcpSettings" : {
          "header" : {
            "type" : "none"
          }
        },
        "kcpSettings" : {
          "header" : {
            "type" : "none"
          },
          "mtu" : 1350,
          "congestion" : false,
          "tti" : 20,
          "uplinkCapacity" : 5,
          "writeBufferSize" : 1,
          "readBufferSize" : 1,
          "downlinkCapacity" : 20
        },
        "security" : "none",
        "network" : "tcp"
      }
    }
  ],
  "routing" : {
    "name" : "all_to_main",
    "domainStrategy" : "AsIs",
    "rules" : [
      {
        "type" : "field",
        "outboundTag" : "gce",
        "port" : "0-65535"
      }
    ]
  },
  "log" : {
    "error" : "\/var\/folders\/4_\/fcwszxr93jzc96dp3pzttx3h0000gn\/T\/cenmrev.v2rayx.log\/error.log",
    "loglevel" : "none",
    "access" : "\/var\/folders\/4_\/fcwszxr93jzc96dp3pzttx3h0000gn\/T\/cenmrev.v2rayx.log\/access.log"
  }
}
4.设置iptables的转发规则
具体参考注释
这一步建议做成脚本,因为每次执行完,重启后还要重新执行。
iptables -t nat -N V2RAY # 新建一个名为 V2RAY 的链
iptables -t nat -A V2RAY -d 192.168.0.0/16 -j RETURN # 直连 192.168.0.0/16
iptables -t nat -A V2RAY -p tcp -j RETURN -m mark --mark 0xff # 直连 SO_MARK 为 0xff 的流量(0xff 是 16 进制数,数值上等同与上面配置的 255),此规则目的是避免代理本机(网关)流量出现回环问题
iptables -t nat -A V2RAY -p tcp -j REDIRECT --to-ports 54321 # 其余流量转发到 54321 端口(即 V2Ray)
iptables -t nat -A PREROUTING -p tcp -j V2RAY # 对局域网其他设备进行透明代理
iptables -t nat -A OUTPUT -p tcp -j V2RAY # 对本机进行透明代理


ip rule add fwmark 1 table 100
ip route add local 0.0.0.0/0 dev lo table 100
iptables -t mangle -N V2RAY_MASK
iptables -t mangle -A V2RAY_MASK -d 192.168.0.0/16 -j RETURN
iptables -t mangle -A V2RAY_MASK -p udp -j TPROXY --on-port 54321 --tproxy-mark 1
iptables -t mangle -A PREROUTING -p udp -j V2RAY_MASK
5.当执行了上面的iptable规则,我们使用刚才的配置来启动路由器中的v2ray并在后台运行
./v2ray -config config.json &
然后在任意的一台终端接入到该路由都可以自由访问谷歌以及外面的世界了
6.接下来要做什么
如果前面都没问题,把所有步骤写成脚本,开机启动即可
透明代理原理
路由器中设置了iptables的转发规则,对设备上的目标流量转发到v2ray的54321端口
假设访问了国外网站,如 Google 等,网关依然会使用的系统 DNS 进行查询,只不过返回的结果是污染过的,而V2Ray提供的 sniffing能够从流量中提取域名信息交由VPS解析。也就是说,每次打算访问被墙的网站,DNS 提供商都知道,只不过我们其实同时还有VPS这条路走。
由于目前V2Ray只能代理TCP/UDP的流量,ICMP不支持,即就算透明代理成功了之后ping Google这类网站也是不通的,但是基本够用了